Note
Hello, welcome to the SunFounder Raspberry Pi & Arduino & ESP32 Enthusiasts Community on Facebook! Dive deeper into Raspberry Pi, Arduino, and ESP32 with fellow enthusiasts.
Why Join?
Expert Support: Solve post-sale issues and technical challenges with help from our community and team.
Learn & Share: Exchange tips and tutorials to enhance your skills.
Exclusive Previews: Get early access to new product announcements and sneak peeks.
Special Discounts: Enjoy exclusive discounts on our newest products.
Festive Promotions and Giveaways: Take part in giveaways and holiday promotions.
👉 Ready to explore and create with us? Click [here] and join today!
About Robot HAT
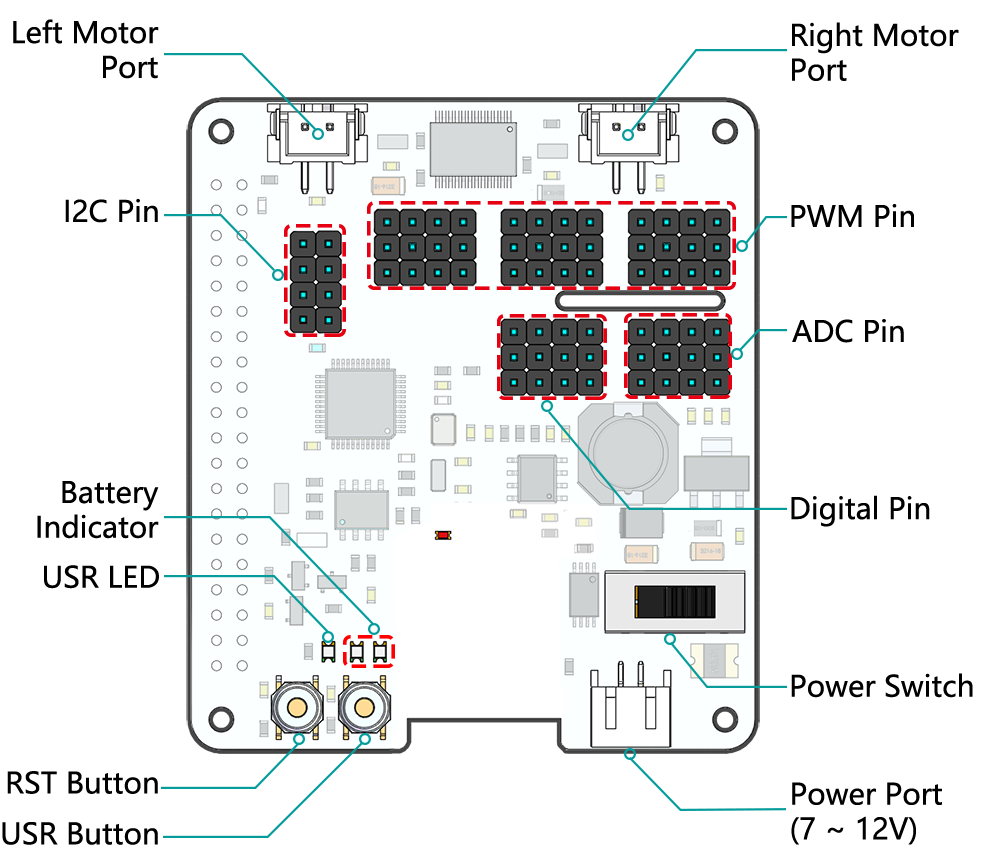
- Left/Right Motor Port
2-channel XH2.54 motor ports.
The left port is connected to GPIO 4 and the right port is connected to GPIO 5.
- I2C Pin
2-channel I2C pins from Raspberry Pi.
- PWM Pin
12-channel PWM pins, P0-P12.
- ADC Pin
4-channel ADC pins, A0-A3.
- Digital Pin
4-channel digital pins, D0-D3.
- Battery Indicator
Two LEDs light up when the voltage is higher than 7.8V.
One LED lights up in the 6.7V to 7.8V range.
Below 6.7V, both LEDs turn off.
- USR LED
Set by your program. (Outputting 1 turns the LED on; Outputting 0 turns it off.)
- RST Button
Short pressing RST Button causes program resetting.
Long press RST Button till the LED lights up then release, and you will disconnect the Bluetooth.
- USR Button
The functions of USR Button can be set by your programming. (Pressing down leads to a input “0”; releasing produces a input “1”. )
- Power Switch
Turn on/off the power of the robot HAT.
When you connect power to the power port, the Raspberry Pi will boot up. However, you will need to switch the power switch to ON to enable Robot HAT.
- Power Port
7-12V PH2.0 2pin power input.
Powering the Raspberry Pi and Robot HAT at the same time.
Note
You can see more details in the Robot HAT Documentation.